 THE GROWING WORLD OF DAHLIAS
![]()
|
|
|
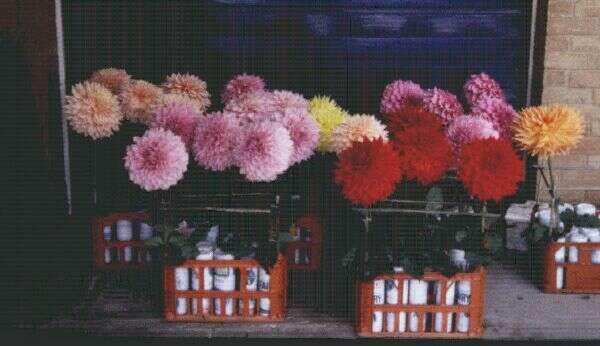
EXHIBITING DAHLIASGrowing dahlias for showing or exhibition is similar to growing for the garden and cut flower arrangements. There are a few areas where extra attention is needed, and more preparation is required, however in this section, I will try to take the mystique out of showing dahlias I will consider the showing process as a three stage exercise:- planning, preparation and staging at the show. Planning.If you intend showing dahlias, you need to know what qualities are required in your dahlias. To this end, you must understand the judging rules for your country, as they differ slightly in different parts of the world. At this stage, I will consider the judging rules for the UK, as laid down by the National Dahlia Society. Shows will normally be judged by a qualified judge who has had to pass a judging examination set by the NDS, so that judges work to the same criteria. We all like to think we have perfect dahlias, but sadly this is not the case, and the task of the judge is to find the faults with the blooms, and the ones with least faults will be the winners. Some faults are extreme and these could cause the exhibit to be disqualified. Normally these faults result from the exhibitor failing to follow the rules and regulations for the show. Other faults are considered as either major or minor and are consistent for most classifications of dahlias. Each classification of dahlia has its own ideals, so the intending exhibitor must familiarise himself (or herself) with these ideals and the faults that detract from the ideal. You also need to know what is required at the show in terms of the schedule of classes and the show regulations. Infringing the rules will bring about disqualification, so it is important to follow the rules to avoid wasting the season's work. There are different types of shows, specialist dahlia shows where there are up to 50 classes for different types of dahlias and different levels of exhibitor, and general or local shows where a few dahlia classes are included amongst the other flowers and vegetables. Quite often these latter shows are not held at peak dahlia exhibition times, and are not as demanding as specialist shows as they are not judged to NDS rules. They are less likely to be judged by specialist dahlia judges, so the pure exhibition qualities may not be followed as a specialist dahlia grower would expect. To give some idea of the differences between these types of show, I have included sample show schedules from these types of shows. Show regulations include special rules for conduct at the show, which must be followed. You will need to know which shows you intend entering and get some idea of the classes so that you can be sure to grow the correct varieties to give yourself a chance. The shows in the UK take place over a very short period, so timing is fairly critical. Here are a few show dates that I am aware of. If you know of any others, please contact me and I will add them to this list.
Finally, you need to know what varieties to grow and how many of each, as many varieties will not meet the exhibition criteria. As a result of studying show winners over a period of years, I include my recommendations for those likely to give the best chance to win. I don't grow all of these myself as there is an extra factor to take into account. Does that variety like your conditions? If it doesn't, you could spend a year fighting nature and losing. Every showman spends time on varieties that wont make the grade for him, but does for others, that's all part of the hobby.
PreparationThe growing process Having decided which varieties to grow, it is necessary to obtain the best stock you can find as either tubers or plants. The propagation process is similar to that in my diary, but more intensive. Extra attention must be paid to tying as it is essential that the plants and stems are erect. Quite often, giants need to be potted up into 5 inch pots during May to avoid the plants being restricted. Timing of stopping, debranching and disbudding. If I am to have blooms for the early shows, my plants must be stopped by mid June. In the case of giants and poms, these must be stopped in the pots in mid May to allow side branches to develop in time. The poms receive a second stopping at the end of June to increase the size of the bush. I start debranching in mid July, trying to select branches of different ages. It is possible to delay flowering, but not to advance it. This is important if I am to have flowers over the period of the show calendar. Disbudding commences when the terminal buds begin to develop, but again try to select buds to spread the flowering period, see the process in my diary. Show preparation Well before the show season, it is necessary to check you have adequate stocks of the materials you will need. Once the show season is underway, you are not going to have time to obtain them. You need a good supply of split canes and paper twist-its. Make sure you have schedules for the shows you intend to enter, and that you are growing the appropriate varieties. Check staging times to make sure you will have enough time to reach the event and stage your flowers, reducing the classes you intend entering if time is a problem. Check to see if the show provide vases, if not you will need to obtain some of your own, so allow plenty of time for this. Use of neck stretchers. Larger blooms whose heads sit at 45 degrees to the stem tend to be mis-shapen. Gravity causes the bottom petals to be longer than the top petals, an effect known as bearding. In order to prevent this, it is better if the blooms sit on top of the stem, giving a much rounder and more pleasing appearance. In order to achieve this, neck stretchers can be used. A neck stretcher is a split cane with some soft material on the end like a large cotton wool bus, or a small piece of pipe lagging. This is placed on the developing stem and attached with two twist-its, one at the top and one at the bottom. The material needs to be under the chin of the bud and pushing up slightly. Each day as the footstalk is extending, the stretcher must be moved up to remain under the bud. This process can stop when the stem has hardened and the bud is at the best angle, The neck stretcher can be left in place as a support to the stem and ready for cutting the bloom when it has developed Bloom protection When the buds start to show colour, many exhibitors erect some form of covering to protect the flowers. Rain will get into the blooms and cause them to get heavier which may well snap the stems, or cause the petals to rot on the stem. Excess sun will cause the flowers to be bleached, and this is particularly obvious on red and purple blooms. It rarely is evident on white and yellow blooms, so many showmen concentrate on these colours on the show bench. The strong winds that blow every year in early September will also cause much damage. Many growers erect a large wooden framework that is covered with thick polythene above the plants. the polythene has to be secured very firmly to prevent it taking off in strong winds. The disadvantage to the cover is that natural moisture doesn't reach the plants and many growers install seep hoses around their plants to supply the water. A further disadvantage is that the Autumn dews will develop on the ground and as the day warms, this moisture will rise under the covers and often mark the back petals of a bloom. Quite often, these covers have Rokolene wind break material fixed around the sides to prevent the effect of winds. A cheaper form of covering is the use of umbrellas, or polythene cones attached to strong stakes. These can be used to protect individual blooms and moved to another after the first is cut. These are easier to work with than large covers, but occupy more space, and are not as effective overall. Umbrellas are particularly useful to avoid bleaching. Instead of using Rokolene for wind protection, some people use a natural barrier like a row of runner beans alongside the dahlias on the windward side. Growers normally use covers for medium blooms and upwards, but not for smalls and below as the blooms suffer less with water in the petals. Transport preparation Well before the show season commences, make sure you have adequate facilities to transport your blooms to the show. Most people use adapted crates or tubs for this purpose, and these need to be prepared before you are going to the show! The crate is adapted by fitting a framework of canes above the crate. The crate should be filled with plastic bottles, not glass ones as these will make the crate too heavy to carry far.
You also need to know which vehicle you are taking and how many containers it will hold comfortably. If you need more containers than will fit in your vehicle, you have two options - either take less blooms or try to hire a van that will hold all you need. The latter can be expensive and often they are not available for the day/night that you need so ensure you book it early. Some growers make a special framework to fit in their vehicles to maximise the number of blooms they can carry, and again this has to be done well before you are busy preparing blooms for the show. Show entry forms. Mane sure your entry forms are completed and returned to the Show Secretary at least two weeks before the show. This allows time for queries to be resolved and for the show secretary to return confirmation and showground entry tickets where needed. If you are not sure what classes you can enter, it is possible to add a few extras in case you have the blooms when the day arrives. This is better than finding you cant enter the blooms you have because you did not enter the class. Judging Rings and Classified Directory In order to ensure that you blooms conform to the size restrictions, you need a set of judging rings. These are the same rings used by the judges and are essential for any showman in the UK. You also need a copy of the current Classified Directory as this is used by the judges to determine whether the variety is eligible for the class. You can order both the judging rings and the Classified Directory from The General Secretary of the NDS. Again, if you need them, order in good time to allow the secretary to send them to you. Show checklist I always make a checklist before the show to ensure I have forgotten nothing. I keep a "show box" which contains pens, tweezers, scissors, name cards, and cotton wool buds. My checklist will be made up of - show box; judging rings; classified directory; water containers (full); vases (if needed); knife; secateurs; newspapers for packing; floral foam (Oasis); polystyrene blocks for raising vases on staging; rubbish sack; food and drink; show schedule and exhibitors details; showground entry ticket and map to find showground. I also write out a list of classes entered and the blooms I intend entering in them. Check against the classified directory that the varieties are eligible for the classes entered. Selection of blooms In the week leading up to the show, check to see which blooms are likely to be at their best on show day. As they are selected, the should be supported with a split cane attached with two twist-its. In selecting, it is important to bear in mind the qualities that are required in the exhibit. The blooms should be balanced for size and colour and facing the same way when staged, and obviously should be as near perfection as can be achieved. As the show nears, check the schedule again to see if you have sufficient blooms for your entry, if you don't have enough for the vase, then leave them out to reduce work and unnecessary carrying. Cutting bleeding and tying Most blooms need to be cut the morning before the show. Cutting is best in the morning when the plant is full of water and fully turgid as the blooms will keep better in this condition. The blooms of cactus varieties can be cut two days before the show and left in a cool place in cold water. They tend to develop more quilled petals as a result of this. As they are being cut earlier that the other blooms, they should be slightly younger than those to be cut just before the show. Before the blooms are cut you must ensure they are supported with a split cane and twist-its if this has not been done earlier. The split cane acts as a guide to the stem length for the vehicle after packing. Before cutting ensure you have a tub of cold water close by so the bloom is out of water for the minimum time. Check that the bloom will pass easily through the judging ring for its size before cutting, since blooms do not get smaller. The stem should be cut at an angle at the bottom of the cane. The cut bloom should always be carried with the head down to avoid damage due to the weight of the head. Once cut, the stem should be put into the tub of cold water as quickly as possible. Since dahlias are hollow stemmed flowers, there will be air trapped in the cut stem. This has to be released to allow the bloom to take up the water properly. This is a process called bleeding. Insert the blade of a thin sharp knife into the stem about an inch below the water level, and this will release the air bubbles from the stem. When you have the set of blooms, they can be tied into the transport container. A twist-it is used to fix the stem and attached split cane to the framework around the crate so that the stem and bloom can't move. As each bloom is put into the crate, make sure that it is not touching any other, since blooms rubbing together will be damaged. Value of spares It is always worth taking one or two spares in case there are any problems with the selected set of blooms. The disadvantage is that too many spares may make transporting difficult as you reach the capacity of your transport. many people mark their spares with a piece of coloured wool on the stems to avoid wasting time at the show.
Transporting Before loading the blooms into your vehicle, check your show schedule to ensure you have complete exhibits, plus the odd spare. If you don't have a full exhibit, then leave it behind as it will only waste transport space. The crates should be carefully loaded into the vehicle, ensuring that the blooms are not touching. The crates can be help apart by the other materials you need to take, e.g. show box, newspapers, oasis and polystyrene tiles. In the case of tubs, some people use a house brick in the base to make them more stable. Importantly, ensure you leave enough time to reach your destination comfortably . Transport for more details on carrying blooms.
Staging at the ShowWhat to do on arriving at the destination On reaching the showground, find where the show is being held and park at the most convenient point. Go into the show room to get your bearings and check the facilities, is there enough water, are there any vases and what types and sizes, is the staging flat or tiered, are there any staging tables available, how much space is available for your blooms to be unloaded? Collect your exhibitors cards and check against your schedule to confirm all is in order. Staging tables Most shows provide staging tables for their exhibitors, but there are never enough. Exhibitors should not stage on the show benches as this prevents others from setting up their exhibits. (Never the less, there are always a few who don't consider others). You will probably need to share a staging table, so find one to use as your base and go to unload your equipment (show box, packing, oasis). You may have to bring your flowers in one container at a time, make sure the flowers are not in the paths of the room so they cannot be damaged as others pass by. Vases There are several types and sizes of vases. Some are made of aluminium and some of plastic. Some have integral bases and some have detachable bases. These latter are better in that the can be stacked for storage purposes. Most exhibitors use a plastic vase called a Bikini vase. These vases were produced in magnolia, light green and dark green colours, and in four sizes. The smallest, 7inches tall by 2 inches diameter on a 4 inch base is really designed for specimen roses, and other than for a single pompon bloom would not be used for dahlias. The next size is 8 inches by 3inch top on a 5.25 inch base and these are normally used for pompon exhibits. The second size is 11 inches by 3 inch top on a 5.25 inch base and these are used for single giants or three bloom exhibits of smaller sized blooms. The largest and most used size is 12inches by 4.25 inches on a 5.25 inch base, and these are used for most exhibits. They wer manufactured by C Sales & Son, who do not currently advertise in dahlia literature but sell direct to the public. See their website http://www.bikinivases.net/ for more details. Green bikini vases can also be obtained from LBS Plastics, Standroyd Mill, Cottontree, Colne, Lancashire BB8 7BW, Tel 0870 727 3616. You should collect the necessary vases in the sizes you require from the vase steward. Do not take more than you need as this makes life difficult for those who arrive after you. I have often found no vases available to stage my exhibits in the night and large numbers available when other exhibitors have finished staging. Often your entry cards are required so that the exact number of vases are issued to prevent these selfish attitudes. Types of staging, flat/tiered Staging may either be flat, or tiered. Tiers may be two or three levels. Check the depths of the steps between the tiers, are they the same as this is not always the case and may affect they way the blooms are put in the vase. Schedule checks Before starting to stage, do another check of your schedule. Confirm you have sufficient blooms for the exhibits and where they are to be placed in show room. Are they on flat or tiered staging. No of blooms in the vase At most shows, giants are staged one to a vase, while large and mediums are three to a vase. Small and miniature are usually five per vase but at some shows only three are needed in a vase. This makes it easier to stage them and reduces the time needed to set up your exhibits. Poms are usually six to a vase but sometimes only five are needed. Once again check your schedule as it is easy to get into a habit of staging a set number of blooms in a vase, and the numbers may differ from class to class or different sections of the schedule.. Setting up blooms in the vase/s, bleeding stems When setting up blooms in the vase , you need to consider the effect you are trying to achieve. The blooms should all face the same way and be fully visible, not overlapping each other and the vase should give the impression of a well balanced set.. This applies whether the vase is to contain three or five blooms. Usually a three bloom vase would have two at the back and one at the front, while a five bloom would be three at the back and two at the front.
The actual process of putting the blooms in the vase depends on the packing material you are going to use. Packing must be used to fix the blooms in position, don't leave them to move around each time the vase is touched. If you are using bracken or reeds or damp paper as a packing material, the stems will need to be longer than if you are using floral foam like oasis. Oasis allows you to stage the blooms more quickly, but you only get one chance, while with the other materials, you can re-do the job if you don't like the outcome. Using these other materials, you will need to bleed the bloom stems as they are transferred to the vase, but it is not necessary with oasis. Most people use oasis for staging now. A piece of oasis is cut to fit in the vase without protruding above the top of the vase. Some water is placed in the bottom of the vase and the oasis fitted. More water is added to almost fill the vase. Before I start to place blooms in the vase, I have a vase that only contains water beside me. I carefully remove my selected set from the crate, leaving the support canes on them and place them in the vase so that I can confirm I have a good set and know the best position for each bloom. I check each bloom against the rings as I prepare them for this vase as there is no point in staging a bloom that is too big. The best bloom of your set should be in the centre back with a five bloom vase, but with a three bloom vase I put my best bloom in the centre front. Select your best bloom. and check how high you would like it to stand above the vase, allowing for some stem to be in the vase and trim at an angle at that length after removing the twist-its and the support cane. Check the bloom carefully for blemishes like bruised, old, dying, limp petals or insect damaged petals. These can be pulled out carefully and there should be no evidence of their removal. Any leaves or nodules on the stem that will be in the oasis should be removed and carefully shaved down with a sharp knife to get a smooth stem to be placed in the oasis. Carefully position the bloom at centre back so it is facing the front and push the stem into the oasis until the bloom is at the required height. This is the key for all the other blooms. Next take the back right bloom and go through the same process to get the height and position as required and place the stem in the oasis with the bloom in the correct place and alignment. Repeat for the back left. The front pair have to be lower than the back set. They should be placed between the centre bloom and the appropriate wing flower. With a three bloom vase, I use the centre front as the key bloom and add the back two afterwards. In the case of a six bloom pom vase, the blooms are staged three at the back and three at the front, slightly lower than the back row. I usually carry a few spare pom leaves with me and place these in the oasis at the front of the vase to improve the overall appearance. If you do this however, be certain there are no buds on the attached leaves as these buds count as blooms and you could be disqualified for having too many blooms in the vase. Cleaning the blooms When the blooms are staged in the vase, you must do what the judges will do, so first put the vase on the floor and view from the front and above, looking for blemishes. These should be removed where possible. Then lift the vase and inspect the blooms from the rear and below, again removing blemishes where possible. Using a cotton wool bud or soft artists paint brush, and dust or dirt in the petals should be removed to leave a clean and pristine set of blooms to present to the judges. You can also ensure the petals are folded correctly where needed as this should improve the petal lay. Staging the vase/s Once the vase is ready, if it is in a single vase class, the vase can be carefully carried to its class area. When doing this, keep one hand behind the stems to avoid damage while carrying the. The vase can be placed on the staging, and your exhibitors class card placed face down under the front rim of he vase so it wont blow away. Before you put the vase on the staging, make sure the position is flat and the vase will not tip. Stand back and look at the vase , returning to rotate it slightly to get the best overall effect. In the case of a multi-vase exhibit, keep your first vase beside you while staging the blooms in the second and subsequent vases, using the original vase to gauge the height of the blooms. You may find it worth checking the vases against the staging height to make sure of the most pleasing overall effect. Once again you need to consider the overall appearance of the exhibit to confirm it is well balanced and all blooms are clearly visible.
The vases need to be taken to the class singly. Take the rear vases first and get them positioned, gradually adding the others with the front vases last. You may need to raise some of the vases with your tile packaging to get the blooms to the same height. Don't be afraid to change the positions of the vases in the exhibit to get the best balanced effect. When you are satisfied that you have achieved the best you can, the exhibitors class card should be placed face down under the front rim of the centre. front vase Labels for vase When the vase is on the bench, it should have a variety label attached, unless it is in the seedling/sport class. Some shows provide their own label cards and these should be used. The variety name should be carefully and legibly written on the card and placed beside the vase, trapped under the base. The presence of these label cards make the show more interesting for the general public Final checks of vases/blooms Before leaving the show area, take your schedule with you and check that you have staged all your exhibits correctly, and that they all have exhibitors class cards and name cards (where needed). If you staged some a long time earlier, use the rings to check the blooms have not grown excessively since staging or dropped petals, being prepared to change a bloom in a vase if necessary. The Show secretary will usually let you know five minutes before the end of staging time. Clear away your rubbish and remove your extra packing and other materials to your vehicle. Most shows like the spare blooms to sell to help finance the show, but these can be sorted out outside the show room. Judges and stewards At the end of staging, the judges , stewards and show administrators are the only people allowed in the show area. The stewards help the judges by lifting vases from the bench and returning them afterwards. They write the class results and pass them to the administrators to produce the prize cards which are placed on the exhibits. After all the classes are judged, the judges get together to select exhibits to receive special awards, e.g. best exhibit in show, and runner up, best vase or whatever. In the same way that exhibitors are under time pressures to complete staging before judging time, the judges have to complete judging before show opening time. Returning to the event When you return to the show area, you can determine how you have fared with your exhibits. Do not be too disappointed if you haven't won, the judges have done their best to be fair to all exhibits, and have adjudicated accordingly. You will know what faults you have in your own exhibit, but not what others have. Also remember it may be two hours since the class was judged and the blooms continue to develop, some may have come nearer to perfection, some may have passed their best. It is important to remember that the show is made by the losers, not the winners, the more exhibits the better for the show, so everyone wins. How to improve, getting advice You can improve on future occasions with the benefit of advice from other exhibitors and the judges or stewards (who will have heard the judges comments). Don't be afraid to ask for help from any other enthusiasts, they will usually give you the time you need. If you are a newcomer to showing, you can ask for advice on reaching the show before staging. There is usually an experienced exhibitor available to give you help. Seedling classes and differences Seedling classes are slightly different to other classes. They are for new varieties raised by the exhibitor. If the variety has already been named, it is likely that the judge will know whose variety, and therefore exhibit, it is. Seedlings and sports need to be judged on potential, not totally on quality. The future potential of the variety against existing varieties of that type is used in judging seedlings. For instance, a small cactus will have to be exceptional to have more potential than the Kiwi Gloria family, while the medium decorative class is seen as weak at the moment, hence a good new medium decorative has a better chance than a new small cactus. Last updated August 13, 2007 |
For problems or questions regarding this web contact
[ProjectEmail].
|